Thursday, October 25, 2012

Rusted flowers....

Some may find that in my studio are a lot of things.  Some might call it junk, but  for me  they are treasures just waiting for the right idea or inspiration to come along. Recently in my Literature and Art class that I teach, we did a wonderful art project known as "Picasette" - a form of mosaics using chipped and broken china - in another word -Trash Art.  We read a short story from 1967 called The Junk on Juniper Street.  The old saying is true - "One man's junk is another one's treasure."  I wish I had taken pictures - the girls loved it...they loved digging through my glass punch bowl of "tosh" (another great word used by a good friend of mine- Thanks Fran!) Someone asked me if I just bought all this stuff for class and of course I said "No, it's been years in the making." And trust me when I say there is plenty more of "tosh" in the studio and the sewing room!

Here's a story about a little "tosh" lying around in the studio.  A while ago I find some really ugly bright, not quite my style place cards at the treasure store and picked them up for 99 cents for all 6! Even if they didn't work out, they truly could wind up in the trash and I'ld be ok with it.  Here they are before---(Yeah me!  I remembered to take a picture)

a little bright and not too pretty 

here's one in green- 
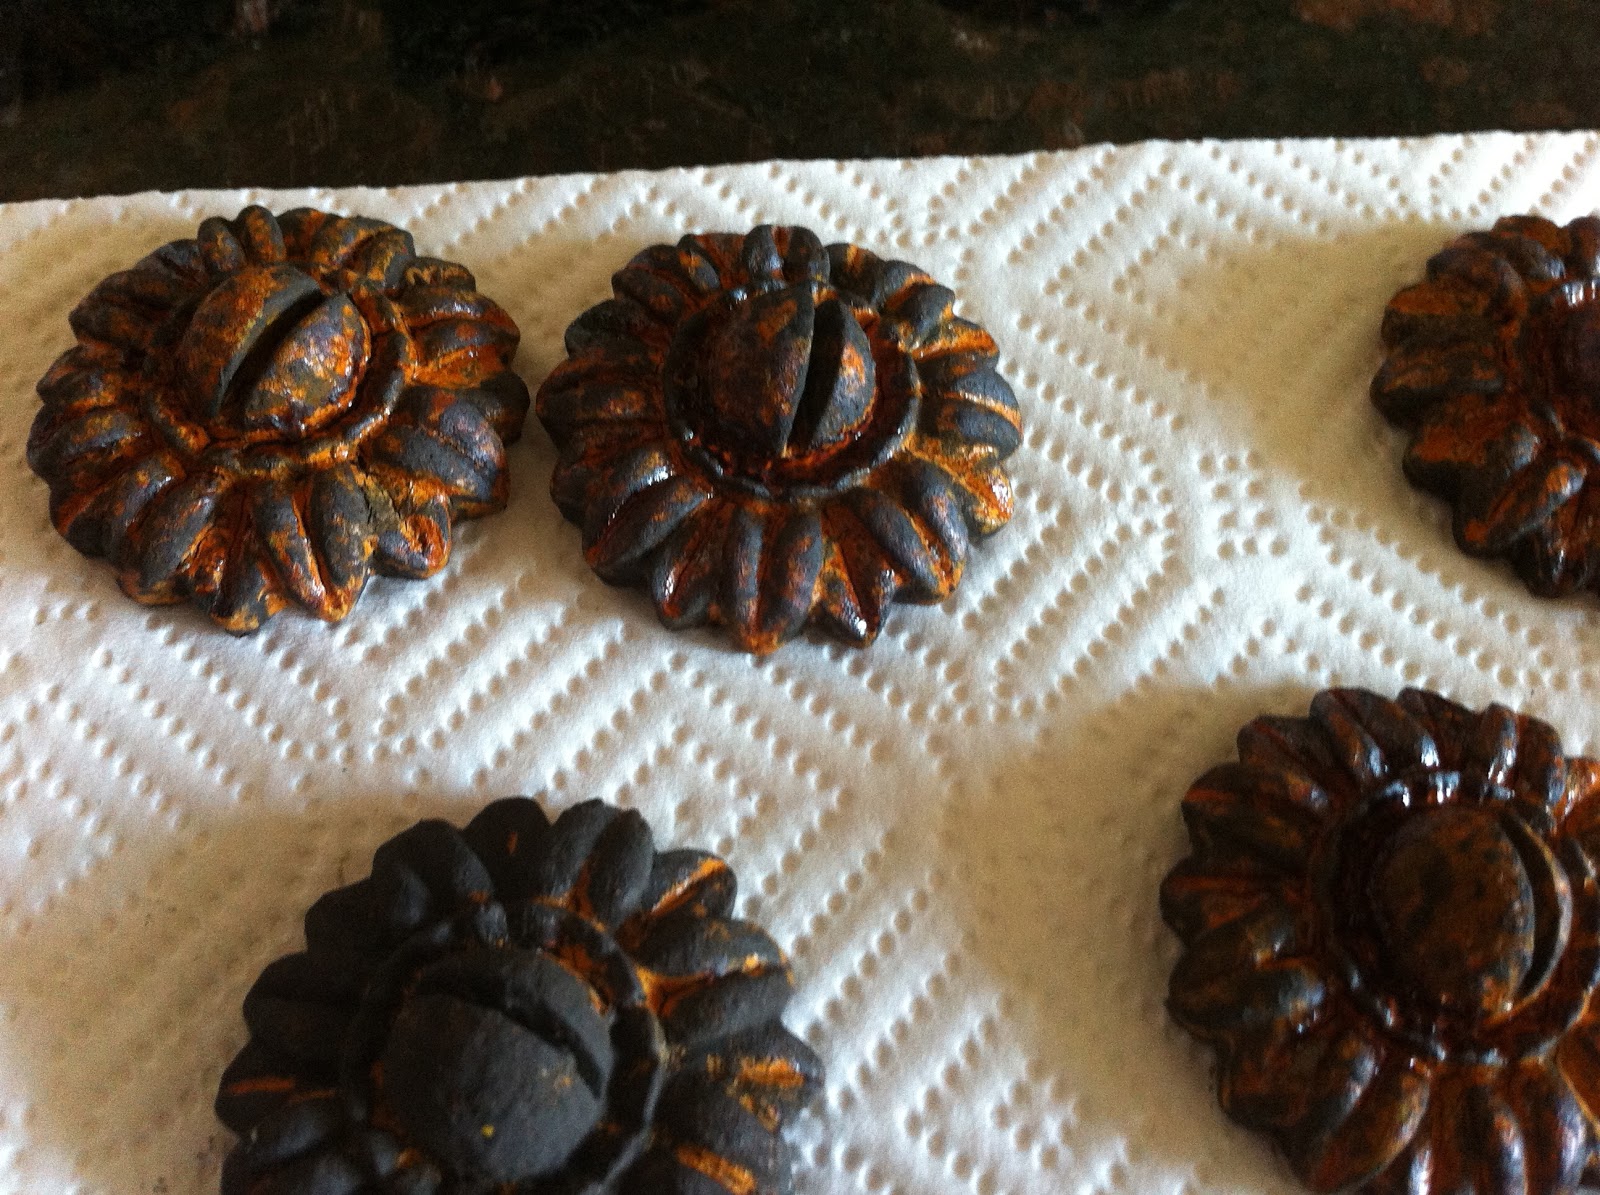
So with a cool technique using VerDay paints by Ten Second Studio These little ugly blooms became rusted, vintage and quite at home in their new look....


Look at the rust-- I know it's crazy how much we love rusted old things....

Look at the depth of rust and color....ooh C'est Magnifique!!

These are now the most awesome little place cards - Most cast aways just need a little TLC, inspiration  and a little paint and with cool techniques such as distressing, rusting, verdigris, etc.  the possibilities are limitless.  Hope your day finds you with filled with treasures.  

Until next time- Blessings,

Monday, October 1, 2012

Spray Painting Fever!! Part 2

Second dresser with Spray Paint, stencil using Martha Stewart paint and stencil,
finished with Annie Sloan dark wax 
This is my second dresser redo with Krylon Dual Spray Paint.  I absolutely love this stuff!! I did forget to take the before pictures.  But trust me when I say that this is WAY better!! This dresser was originally a dark blue that someone had repainted white.  However you could still see the blue when you opened the drawers, there were white drips running down the side and then sticky residue was on the top of the dresser as well as the front of the drawers.  I had originally paid $9.98 (found at one of my local treasure store on 50% off day)  for it and gave it to my mom when it was a white dresser.  She decided after a few months of the dresser sitting in the garage, that she didn't have room for it.  So when I took it back, I knew it needed to be upstairs in our beach room.   But oh - it needed TLC!

First, I wiped down the dresser with murphy oil soap wipes.  I love these as they are easy to use and do not leave a residue but clean the wood.  Then I did need to use goo gone for the sticky stuff.  Worked like a charm.  Then started spraying with a light hand moving back and forth.  I waited in between coats- this dresser used a little over 2 cans!!  Once the paint on the drawer fronts were dry, I used Martha Stewarts acrylic paint in a rich brown and one of her stencils from the "doily" collection (I don't' know if that is what it is called but the stencil is a doily so it work's for me). Her blue adhesive tape also works great with stenciling.  I stenciled using the dry brush method - meaning not a lot of paint on the brush but the effect is great!  Once I removed the stencil, I painted Annie Sloan's dark wax over the drawers, one at a time, and then wiped immediately.  I also did the dresser top, sided and front.  The wax was great! It grabbed where the original drippys were and wherever there was any kind of rough patch -It looks awesome!

I'll have to say that my mom is wishing she had kept the dresser.  But sad to say that it isn't up for grabs anymore.  Presleigh will soon fill it with treasures.   As they say one woman's  trash  donation is another woman's treasure.  I do come by quite a few treasures!!

I would love to hear of your great treasure finds--Until then, Happy hunting!

Friday, September 14, 2012

Spray it with Paint!


I found this dresser at my local treasure store and the price tag was $19.98. ( I had already  removed the top two drawers and started painting before I took my "before" picture).  That sounds like a good deal but it gets even better.  I had my 50% off coupon good on Wednesdays and guess what?  It was Wednesday!!  This dresser was a steal at less than $10!! 


Before the magic....
How unfortunate that someone had left something that made water rings/stains. So I knew that sanding would be involved but for $10 who minds a little exercise.
water stains on the top of the dresser.

Originally it was to be put in our den so I knew it needed to be black.  I wasn't sure that I wanted to use a high priced paint such as the incredible Annie Sloan but I knew that it might need primer.  So a trip to my local Walmart proved to be invaluable.  The saying at my house is that "No matter where I go, I end up at Walmart."  So on one of my many daily weekly trips, I stopped by the paint aisle and found Dual spray paint with primer--at less than $5 a can, I grabbed 3!!  This was to be a trial project - so if it worked, I could do more furniture redo's -if it didn't I was only out $25 and a little time.  To begin, I sprayed the drawers, the paint covered so incredibly well that I moved onto the dresser - I actually cleaned the dresser first and only sanded a little bit because with primer in the paint - who needs to get out the sand paper, the rags, the mask - just kidding about the mask - but sanding is a messy job and I didn't want to do it.  This project required a little less than 3 cans (so I am going around to see what else needs to be sprayed- I think I am addicted).  It was quick and easy and it looks likes like incredible in my dining room - Yes it was originally for the den but it was a little big.  Now it holds my table linens and most of my vintage tablecloths and aprons...I also faux finished the handles to look rusted and worn.  The lace doilies and my collection of teacups and china party plates contrast the stark black and gives it a softness.

The key to using the spray paint is light even spraying while moving back and forth across your surface- Sometimes when using spray paint we forget and keep the can pointed in the same place and spraying with a heavy hand (all the force we have).  Result -globs, drips,.. If you move across your surface while spraying with a light hand you will achieve a uniformed look while getting great coverage.
Faux finish on drawer knobs


Tea anyone?

I am in love with spray paint- Easy, Quick and Fantastic Results!!  Future forecast:  More spraying!!


 Until next time,


Blessings....

Wednesday, September 5, 2012

Monday, September 3, 2012

Sisters!!

The day we left to take Savannah to ACU!

A sister is a forever friend.
  ~Author Unknown

Thursday, June 28, 2012

Happy 4th with foam star stamping....


Happy 4th!  I know it's a bit early but I wanted to share a quick and easy way to create stamps for any occasion.  Right now I have - America, the beautiful, Old Glory and that American Pride on my mind.  We live in an incredible country with blessings and opportunities that create a well-lived Life as we pursue life, liberty and the pursuit of happiness.  We are truly blessed by God, the founding fathers and those men and women who have and continue to protect and to defend our nation.  On to the fun.. You can do this with any foam stickers or use foam to create your own.  But when I saw these foam stickers at the $1 section of Target, I knew that I could make some quick star stamps.  Here's how....  
Gather $1 foam stickers, inks, acrylic blocks and paper


Adhere the stickers to an acrylic block

Here I created a border of the stars


Now ink your stamp and stamp on paper
See the texture from the stickers


The paper ribbon is made with the star border and then inked the paper to give it an aged look.

The finished card...with added lace, flowers and the #4 brad in honor of the 4th.  Have fun celebrating our nation's beginning and God bless this land that we love!


Wednesday, June 13, 2012

A little ocean inspiration

We have been back now for about 11 days from our vacation to Amelia Island, Florida.  It was wonderful, restful, eventful and full good times and great memories.  We had beautiful weather at the beginning and the end but for 3 days in the middle, we experienced Tropical Storm Beryl.  The weathermen/women on the local news loved to say that "the Storm is Barreling through (pun intended) and it actually did!  We watched it from our 1st floor condo on the beach...breathtaking, exciting  and a little bit scary!  The Ocean, the beach, the sounds, the waves and all that goes with that part of nature always brings inspiration.  Our creative Heavenly Father provides the greatest source of inspiration, doesn't he?  Whether it be the colors, sounds, textures - my mind goes racing, creating, and of course, finishing all that I can dream.  My hands, however, once home, find laundry, errands, cooking, cleaning, taking care of my sweet family and of course, loving every minute of home keeping. While at the beach, I brought a jewelry traveling kit, a stamping traveling kit and an embroidery traveling kit and of course my crochet hooks and yarns! Here are a few things we made while relaxing in the sun and the rain.  I also want to share a few things I have been working on since I've been home.  Recently a friend asked me what is my main thing that I do and what do I do everyday...I had a hard time answering but after thinking about it - here's my answer.  Every day I create- maybe just a little something, maybe  I add to a work in progress or (my favorite), I begin a new project.  I love what I do so I never stop and think if I have done my "main" thing.  Whether it's spending time with my children and family, crocheting a rug, sewing an apron, painting a flag, adding shells to anything or playing with paper - I am happy being creative, being me and sharing with those around.

A shell Presleigh found and I used hemp to make a necklace (the hole was already there!!)
We also made 3 bracelets and 2 more necklaces.  Savannah crocheted her own bracelet!! 

While it rained, we "delighted" in doing some collage art and stamping.
The background stamp was a mesh net from our produce!!

One of the beautiful sunrises!

One of two flags  I painted from salvaged tin from the barn!

My new Lone Star Flag for my summer porch!

Three treasure store glasses (bought at different times) embellished with jute, shells and tin wire.
These would make great candle holder!

A close up of the tin wire!
I hope you have found inspiration in this wonderful summer season.  Until next time,

Blessings


Tuesday, May 22, 2012

Summer sun...

My new summer beach book bag...tutorial coming soon.    
We are heading to Amelia Island, Florida tomorrow in the wee hours (well 7:25 but we have to leave our home around 5)... But it will be well worth the early sun rise to see the Ocean, Sand, and Sun.  I've packed magazines, my traveling jewelry making kit, my traveling art journaling/stamping kit and my needlework and crochet traveling kit....of course there are some clothes in there somewhere.  In the words of my sweet Savannah, all we need is a swimsuit, a good book and a cover-up.  Presleigh, my extraordinary shell finder is ready to add to her collection of shells (me,too)... the guys will be golfing.  There will be deep sea fishing, shopping, eating, swimming and seashore sitting-- but most of all, there will be togetherness!!!

So before I go, I wanted to share good news..Sew Somerset (publication) hits newsstands on June 1st. This is by far one of the best sewing mixed media publications that I have ever seen...I was so excited.  humbled and honored to be a part of this issue.   My sewing notions technique article are featured on page 30-34.  I hope you enjoy the following photos - This is one of my all time favorite pieces that I created...

They even kept my pins the exact way I had them:)

Love my crochet holder!!!

Until next time,

Blessings

Wednesday, May 16, 2012

Time for Teacher Thank you's...

Today was our last day of school- YEAH!!!!!  Since we homeschool and participate in a Co-Op  with fantastic teachers who love teaching as they also homeschool.  It was that time of year for teacher thank you's - So I thought I would share an idea for a thank you card that they will hopefully set out and remember not only Presleigh but also that teachers touch lives.  


But before I do I wanted to give y'all a little tip---NEVER pass up and old cookbook/notebook ($5) filled with paper that has browned over the years.  I almost did because there wasn't any recipes...but I'm so glad I didn't.  I love the feel of paper that has been around- the texture and the color are amazing...But please do not run the paper through an adhesive machine or use tape adhesive directly on the paper--IT WILL TEAR!! ( I'm really not shouting, I'm trying to save you from shouting something like this #?*! later).  I have now used this paper for tons of gift tags (graduation time of year), cards and I've only just begun! 


So onto the "Thank you's"....I made 4 identical cards - a great idea is worth repeating and chain work is great!! Here's what you need...


*Index card (vintage or new) with initial of first or last name
*papers in a variety of styles - I used 3 - vintage, dotted,  lettered
*ribbons, flowers, embellishments
*stamps with sentiments ( Here is a great source for stamps) 
*Inks- stazon (jet black), color box (chestnut roan- my favorite)   
*tag punch for "merci"
*ATC sizzix die 
*Ultimate adhesive 
*little easel (from Dollar Tree - 2 per pkg.)


Layer papers varying size and edgings, ink edges if desired.
The dotted paper was cut with the sizzix ATC die.

Stamp sentiments on vintage plain paper that has browned over time.
Adhere large sentiment to paper.

Using ribbons, tie around card. Separate each color and tie a series of bows. Adhere
heart charm, flowers and small tag.

Here is one of the cards with a different color index card.
I like it, too!  It matched the colorful personality of the teacher.

On the back of the card (oops, no pic, sorry), I cut out a piece of the vintage paper (just love this stuff), stamped "gratitude" on the top and then wrote our heartfelt thanks.  For an envelope, I used the wonderful clear bags with the strip of adhesive at the top.  I wrapped their gift card in tissue and place the card at the front and the easel in the back with the tissue in between!  I loved making these cards, the teachers loved receiving and the thanks has been given!!


Hope this gives you a little inspiration to take a few minutes and make a heartfelt thank you - you will be glad you did! Until next time,


Blessings,


P.S.  We are still trying to reach 100 followers..the letterpress is waiting for a new home!! Spread the word!!

Wednesday, May 9, 2012

In the Merry Month of May


We have been on a whirlwind since Easter.  To catch up on a few thing.. Spring is definitely as busy as the holidays when there is a Senior in the house.  We had the privilege of working with Vickie Cunningham and her amazing photography skills as we created a day to remember for Savannah's senior photo shoot.  After Easter, I held an artful workshop here at the studio - what a wonderful time with those who attended. Then, we began to get ready for Prom and the After Prom party to be held here.  It was a wonderful night that extended in to the wee hours of Sunday morning, then it was off to Abilene for a "finding"mission- a new place for Morgan that can hold all of us (when we come to visit) next year as we will have Morgan (his last year) and Savannah (her first year)  attending ACU, a new barn for Beau as he will be going with Savannah in August. We had great success- a great place and a great barn all within minutes from ACU!!   Not to be out done, Presleigh had several field trips and an incredible project we did for her Medieval History Class - Scarborough Faire was incredible and Woad has gotten a hold of us!   Graduation Teas and Receptions have begun and we have felt the love from our friends and family. We did manage a trip to Canton as the summer heat is not quite upon us. As to time in the studio,  I have had several custom orders in the midst of the celebrating.  I have also managed to get snippets of time to keep creativity and inspiration flowing.   In June, Sew Somerset will feature sewing notions that I created- be on the look out for the issue to hit newsstands June 1st.  And then of course, there are the daily details of life  (home)school, laundry, chores, running here and there, Church, taking care of the animals, sharing time with friends, - all in all, Life is good!!! Here are a few photos that you might enjoy.


Woad dying  
 Some of the fabrics hanging on the line

 Scarborough Faire
 Savannah, Presleigh with a good friend
 Senior girls and their moms
 Pretty in Pink!
 Good friends, good times
 my Beautiful Savannah 

Capturing her Spirit
 Love the vintage tub and her smile
 Sisters AND friends!
 Gorgeous!!!
Nothing rides like a Deere!

Until next time- Blessings!!

Wednesday, April 11, 2012


I wanted to share with y'all our newly named Chicken Yard/Coop.  I have spent along time thinking of what I would call our little hens' haven...I thought of many cutesy, french, funny names but none seemed to capture the heart of the henhouse  "Feathered Dreams" came to me and was so perfect.  You see,   I have dreamt of having sweet little (bantam) hens, affectionately known as "Our girlies"  for over 20 years.  Last April, my husband said that I didn't need his permission to have them but I sure wanted his blessing! And I definitely received it.  We built a wonderful chicken yard complete with a small starter coop, grass, colorful mexican heather growing in pots, and 2 wonderful iron chairs for us to sit and  chicken watch.  IF you haven't done this, it is way better than people watching.  Presleigh and I even go out there and do some of our school work.  We read aloud novels, work on  math and all of us share fun times.  We have happy (and smart) hens!   The sign above has a dual purpose...our name but also shelter in the time of rain...This however is one area that the hens don't seem to understand-when it rains, they stay and get wet.  I guess they love to play in the rain! Stay tuned for more pictures of this wonderful feathered dream as the new larger coop arrives in about 2 weeks.  Until next time,

here are 4 of our girlies...
Blessings,