Tuesday, February 26, 2013

Simply stamped and simply stunning

Recently I was mailing a few aprons and needed tags for the wrapped packages.  Needing something cute but quick- I turned to a few favorite supplies.  When I am pressed for time, the results can be quite wonderful and the time crunch helps me to realize that not everything has to be over the top, filled to the brim, covered from corner to corner.  Sometimes Most of the time - The simple things in life are the best things....It's ok to be simple, simply stated, simply stamped  and simply stunning.  Here are a few pictures of the finished tags  with the  "how to's" and the simple supplies.  I hope you enjoy this idea and always remember to enjoy the simple things in life for one day when you look back they will have been the big things (btw--I have that trustworthy saying on a stamp:).....


Gather Supplies

*Small shipping tags
*Vintage library cards
*Tag punch - I used the fiskars tag for this project.  It punches the thicker card stock with ease.
*Stazon ink (black)
*Colorbox ink (Chestnut Roan)
*Stamp of your choice 
*Paper Roses with floral stems
*Craft adhesive 
*Hole punch
*Ribbon or Rickrack.

small shipping tags, card catalog tags, stamps, rick rack and paper roses.


How to.....

1.  Using the fiskars tag punch, punch tags from the library card.
2.  Ink stamp with Stazon and stamp image on all tags
3.  Using chestnut roan, ink the edges of the tags.
4.  At the top of the library card tags, punch hole for rickrack or ribbon
5.  To create the curly stems, use a small skewer or dowel and wrap the stem around it several times to create the curly cues...I just love this!!


Here are the curly cues made with a larger dowel and wrapped heavy gauge wire

6.  Using adhesive, glue the flower to the tag, do not glue the stem.  Allow to dry.
***Tip:  If when the image was stamped there happened to be a smudge--use the flower to hide this little oops--I'm not claiming or denying any such oops in my tags--I'm just sayin'
7.  When dry, cut desired length of rickrack and slip it through the holes of the tag and then tie a knot.  ***Option 2..use Tim Holtz's tiny attacher for the rick rack and staple through the layers and then it will lay flat.  

Simple but stunning--when I look at these tags- I just get happy..perhaps it's the colors, the vintage cards and rickrack or perhaps I know that  these took me about 10 minutes and they were perfectly paired with my Aprons!  Whatever the reasons- I just love simple!!! Now it's your turn, let's link  your simple and stunning projects...

Wednesday, January 30, 2013

Valentine typography tutorial

Have you seen all the beautiful typography that is all over everywhere...if you haven't, I think you might need to get out a little more.  All the fonts, the sayings, the colors, the words are quite the rage...There are tons of computer tutorials for these letter beauties.  However, sometimes one can get discouraged about their own limits of creating in this technology driven world.     When someone begins with just go to photoshop and reverse the image and then use the layers effect.....well you lost me at just go to photoshop, I actually thought we were shopping! No, not really but with me, hands on is still the best approach.  So what is a gal to do to create some of her own typography?  
Head to your stash of scrap-booking stickers and find some words, thoughts, expression, letters and let the magic begin...


Sweet valentine's stickers that I've had for years!!
Regular printing paper
Position your stickers on copy paper, copy it and then you will have two copies to
create a larger piece of typography.

Next you will need freezer paper, muslin, scissors and an iron.
Iron muslin to freezer paper, shiny side up. No steam!! By the way, best iron ever
Black and Decker Classic - nice and heavy! Trim muslin to fit in the the paper tray of your printer.  Make sure that the muslin adheres firmly to the freezer paper, paying close attention to the corners.  
Using your arranged sticker paper and your printer, place the prepared muslin into the paper tray (* I remove all of the paper so as not to have any paper jams).  This is the printed muslin after it has gone through the printer...
I created varying shades- so as to create different effects.  You could even do a black and white--ooh, that would be so beautiful..I'm going to do this once I finish this post.  


a better view of the printed muslin  
You are my everything!!-Isn't that truly the best sentiment ever!!

I have already begun to use the lightest muslin as a trio of hearts -perhaps as a banner or as little sachets. You could frame the printed fabric, add it to a project or let this be the project!! Any way you choose, it is a great and easy way to create typography for that Love-ly Holiday!!

If you would like to check out another trio of hearts, my Linen Hearts are featured in the current issue.
Heart Wreaths for everyday decor--that's me!!!

Linen Love-- these hang in my home all year long.. Love isn't only for a day - it is for a lifetime.   
I would love to know of your heart-felt projects and inspirations.  Feel free to share on my first ever link party- a heart full of linen, love and inspiration!! and we will have a giveaway at the end of the party!! So let's link up with lots of love.....

P.S.  Don't worry, we are not in Hawaii as the link says- just a first timer forgetting to change the time zone.  We are still in the great state of Texas!!

Until next time--Blessings

Thursday, January 17, 2013

Linen Love

I am so honored and excited to be in the new issue of Somerset Life.  A beautiful publication that showcases living the life through creative avenues.  My trio of linen wreaths are featured on page 56.  They are wonderful and carefree to make - a little linen, a little embellishing and a whole lot of love!!


My wreath article made the cover- not the picture but still am on the cover!!!

Linen Love!

A close up (photo from home) of one of the hearts
I do hope this inspires you to keep wreaths up all year long -As these will grace my windows long after Valentine's Day is over - we can always use a little {linen} love in our homes!!

Saturday, January 5, 2013

Every day is a gift

Even though Christmas Day has past, the decorations have been put away, and Bing Crosby's White Christmas along with all the other holiday songs have been shuffled off of our play list...Every day is a Gift.  If we choose to see the beauty and the blessings in every day -yes, even the worst of days, they in time will become a cherished part of who we are.  Someone once told me (in regard to parenting) that the days are slow but the years are fast.  I find that the days go fast and the years go faster.  I want to be the person who cherishes each day and more so the people whom I share that day with!  I also want to prioritize my days, so that my energy, my talents and my time will help to make the day a gift for my husband, children, parents, friends and those who I come into contact with.  It may mean slowing down or saying no to all that come along.  It may mean seizing the opportunity or saying yes to the important.   One thing for certain that I know is that it will be seeking with my whole heart (and yes, my calendar) - the Lord...who will make my paths straight, who will help me prioritize my days, who will see me through all of my days - and who is the giver of all good things.  

As I began to re-decorate the outdoors- Here's what I came up with....


Before

Love Every Day!

The table

Love Every Day "alpha card'-one of my favorite things to create

a  gift-slate hearts from my sister

Larger view of the table-(studio in the background)

My sentiment - exactly!!

So now each day when I walk to the hens, to the studio, to the pool, to the outdoor kitchen or to sit by the fire-(or even to take out the trash) ...my eyes will read and my heart will know that indeed-


Every day is a gift!!

Thursday, October 25, 2012

Rusted flowers....

Some may find that in my studio are a lot of things.  Some might call it junk, but  for me  they are treasures just waiting for the right idea or inspiration to come along. Recently in my Literature and Art class that I teach, we did a wonderful art project known as "Picasette" - a form of mosaics using chipped and broken china - in another word -Trash Art.  We read a short story from 1967 called The Junk on Juniper Street.  The old saying is true - "One man's junk is another one's treasure."  I wish I had taken pictures - the girls loved it...they loved digging through my glass punch bowl of "tosh" (another great word used by a good friend of mine- Thanks Fran!) Someone asked me if I just bought all this stuff for class and of course I said "No, it's been years in the making." And trust me when I say there is plenty more of "tosh" in the studio and the sewing room!

Here's a story about a little "tosh" lying around in the studio.  A while ago I find some really ugly bright, not quite my style place cards at the treasure store and picked them up for 99 cents for all 6! Even if they didn't work out, they truly could wind up in the trash and I'ld be ok with it.  Here they are before---(Yeah me!  I remembered to take a picture)

a little bright and not too pretty 

here's one in green- 
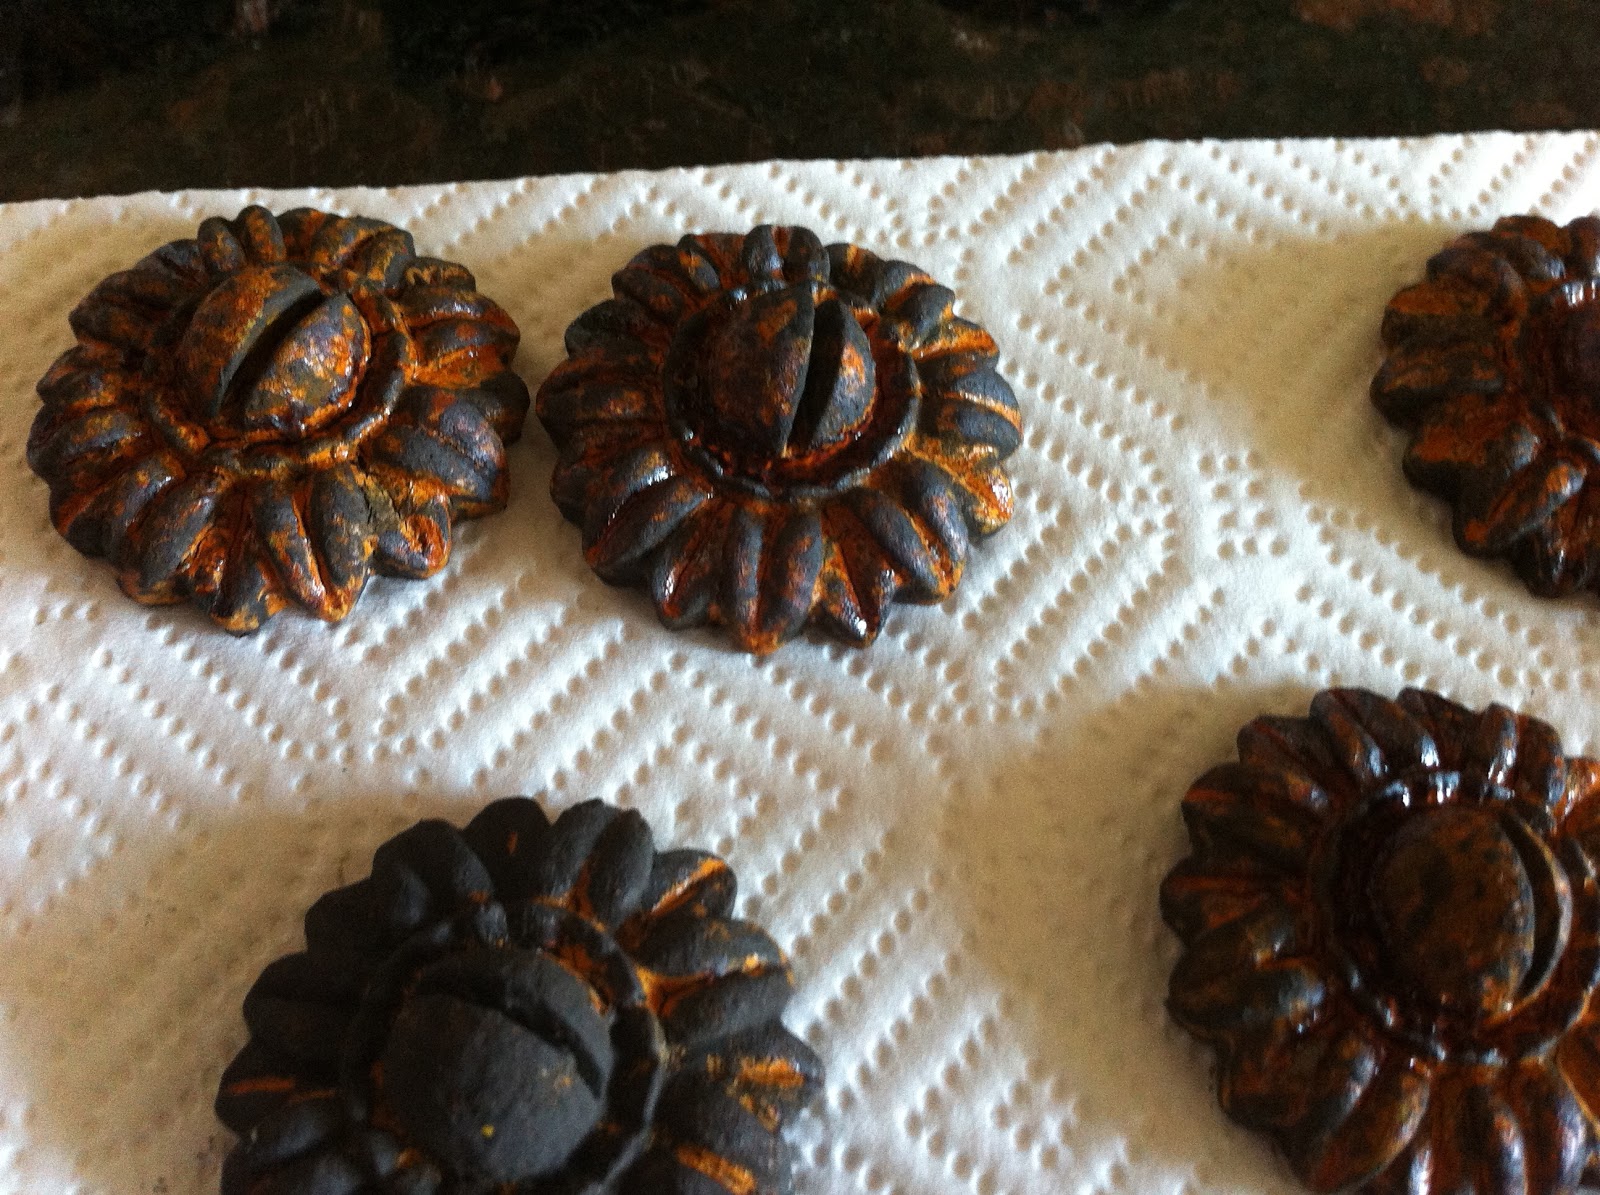
So with a cool technique using VerDay paints by Ten Second Studio These little ugly blooms became rusted, vintage and quite at home in their new look....


Look at the rust-- I know it's crazy how much we love rusted old things....

Look at the depth of rust and color....ooh C'est Magnifique!!

These are now the most awesome little place cards - Most cast aways just need a little TLC, inspiration  and a little paint and with cool techniques such as distressing, rusting, verdigris, etc.  the possibilities are limitless.  Hope your day finds you with filled with treasures.  

Until next time- Blessings,

Monday, October 1, 2012

Spray Painting Fever!! Part 2

Second dresser with Spray Paint, stencil using Martha Stewart paint and stencil,
finished with Annie Sloan dark wax 
This is my second dresser redo with Krylon Dual Spray Paint.  I absolutely love this stuff!! I did forget to take the before pictures.  But trust me when I say that this is WAY better!! This dresser was originally a dark blue that someone had repainted white.  However you could still see the blue when you opened the drawers, there were white drips running down the side and then sticky residue was on the top of the dresser as well as the front of the drawers.  I had originally paid $9.98 (found at one of my local treasure store on 50% off day)  for it and gave it to my mom when it was a white dresser.  She decided after a few months of the dresser sitting in the garage, that she didn't have room for it.  So when I took it back, I knew it needed to be upstairs in our beach room.   But oh - it needed TLC!

First, I wiped down the dresser with murphy oil soap wipes.  I love these as they are easy to use and do not leave a residue but clean the wood.  Then I did need to use goo gone for the sticky stuff.  Worked like a charm.  Then started spraying with a light hand moving back and forth.  I waited in between coats- this dresser used a little over 2 cans!!  Once the paint on the drawer fronts were dry, I used Martha Stewarts acrylic paint in a rich brown and one of her stencils from the "doily" collection (I don't' know if that is what it is called but the stencil is a doily so it work's for me). Her blue adhesive tape also works great with stenciling.  I stenciled using the dry brush method - meaning not a lot of paint on the brush but the effect is great!  Once I removed the stencil, I painted Annie Sloan's dark wax over the drawers, one at a time, and then wiped immediately.  I also did the dresser top, sided and front.  The wax was great! It grabbed where the original drippys were and wherever there was any kind of rough patch -It looks awesome!

I'll have to say that my mom is wishing she had kept the dresser.  But sad to say that it isn't up for grabs anymore.  Presleigh will soon fill it with treasures.   As they say one woman's  trash  donation is another woman's treasure.  I do come by quite a few treasures!!

I would love to hear of your great treasure finds--Until then, Happy hunting!

Friday, September 14, 2012

Spray it with Paint!


I found this dresser at my local treasure store and the price tag was $19.98. ( I had already  removed the top two drawers and started painting before I took my "before" picture).  That sounds like a good deal but it gets even better.  I had my 50% off coupon good on Wednesdays and guess what?  It was Wednesday!!  This dresser was a steal at less than $10!! 


Before the magic....
How unfortunate that someone had left something that made water rings/stains. So I knew that sanding would be involved but for $10 who minds a little exercise.
water stains on the top of the dresser.

Originally it was to be put in our den so I knew it needed to be black.  I wasn't sure that I wanted to use a high priced paint such as the incredible Annie Sloan but I knew that it might need primer.  So a trip to my local Walmart proved to be invaluable.  The saying at my house is that "No matter where I go, I end up at Walmart."  So on one of my many daily weekly trips, I stopped by the paint aisle and found Dual spray paint with primer--at less than $5 a can, I grabbed 3!!  This was to be a trial project - so if it worked, I could do more furniture redo's -if it didn't I was only out $25 and a little time.  To begin, I sprayed the drawers, the paint covered so incredibly well that I moved onto the dresser - I actually cleaned the dresser first and only sanded a little bit because with primer in the paint - who needs to get out the sand paper, the rags, the mask - just kidding about the mask - but sanding is a messy job and I didn't want to do it.  This project required a little less than 3 cans (so I am going around to see what else needs to be sprayed- I think I am addicted).  It was quick and easy and it looks likes like incredible in my dining room - Yes it was originally for the den but it was a little big.  Now it holds my table linens and most of my vintage tablecloths and aprons...I also faux finished the handles to look rusted and worn.  The lace doilies and my collection of teacups and china party plates contrast the stark black and gives it a softness.

The key to using the spray paint is light even spraying while moving back and forth across your surface- Sometimes when using spray paint we forget and keep the can pointed in the same place and spraying with a heavy hand (all the force we have).  Result -globs, drips,.. If you move across your surface while spraying with a light hand you will achieve a uniformed look while getting great coverage.
Faux finish on drawer knobs


Tea anyone?

I am in love with spray paint- Easy, Quick and Fantastic Results!!  Future forecast:  More spraying!!


 Until next time,


Blessings....