Monday, March 26, 2012

A new date for A Spoonful of Art Class


Please join me for a Spoonful of Fun and Creativity as we alter a vintage silver spoon. We will learn to make our own nests from gatherings such as tissue, paper, twigs, and string. Also, as a part of our class, we will learn wire wrapping with beads for the handle and the silver wire nest holding precious pearl eggs. Lastly we’ll finish off with a sentiment tag secured by a vintage button. Your class kit will include all the materials needed for this one of kind art creation. You may bring some of your treasures and trinkets if you would like - but I will be supplying all that you need. Here are the details.

Date: Saturday, April 14, 2012

Time: 1:30pm -4:30pm

Where: My Art Studio, Rowlett, TX

Cost: $45.00- this includes all supplies as well as afternoon refreshments

Registrations/payment begins March 27. Please click on the link at the top right of my blog.

Once registered, I'll be emailing everyone with my exact address and further details.

Hope to see you soon! Until next time,


Saturday, March 24, 2012

Creative Chemistry Class with Tim Holtz


I finally understand Chemistry...Creative Chemistry that is. Tim Holtz is teaching a ten day Online Course, showing the how's and why's of inks and stains and how they work the way they do and how we can stretch and play with the results. I am loving the content, the connection and the refresher course on things that I have known in the past. I thought I would show you my renditions of Day 2 - working with Distress inks. It is wonderful to get in the studio to play and create and to venture into new territory....I love distress even more now!! We will start Day 6 on Monday, so I better get busy on the techniques from Day 3- Day 5. Here they are....

This is a spritzing technique that creates
wonderful backgrounds

A close up of what the water does to the ink
when spritzed and then heat set.

A water color effect using distress inks, water
and a floral stamp on watercolor paper.


a close up of the flower and
the blending of colors.


This is called wrinkle free distress..
It's a layered technique creating
incredible backgrounds.
a close up of the layering...gorgeous!
Hope you are inspired to go and play with inks, paper and your creativity!
Until next time,


Blessings,

Tuesday, March 20, 2012

Annie Sloan redo....

I recently (well not recently, actually about 2 months ago) bought a wooden magazine holder for $1.98. at one of my favorite treasure stores. However, it was definitely dated and did not suit my decorating style. It has sat in the garage for awhile and as I passed it, I knew what I wanted to do but just didn't find the time or rather make the time. Here is the before picture....


It was barn red with Noah's ark on both sides...Now I do love Noah and the wonderful promise we receive from that Biblical event...but nonetheless, it did not go with our den. So with several days at home (in a row-that's the key), I gathered Annie Sloan Chalk Paint (Old Ochre), brushes, rags, the dark wax and began to transform Noah and the animals into a great magazine holder.

I have refinished many furniture pieces through the long process of stripping, sanding, priming and then painting, varnish, gloss or wax finishing. However, Annie Sloan paint is all the rage, so I wanted to try it on something smaller before I venture to a coffee table that is waiting in the garage...I am here to say that --IT IS AWESOME!! Two coats, dark wax for the finish and it is done.

**One key tip to pass on is to use a brush for the wax, especially the dark wax. I brushed it on and then used an old t-shirt to buff. For the brush, dip it in the wax and get a small amount. Then brush in the direction of the grain until there is no more wax. Then with the used t-shirt, buff into the wood and let dry. It only takes a little while to dry. Here is the finished result...

Now to fill this with great reads, inspirations ---I think it turned out great. Now onto the coffee table. Until next time,

Blessings,

Thursday, March 15, 2012

And the winner is....


Congratulations to Carol Mae.
She is the winner of my "Thrifting" giveaway.
I'll email you right away for your address....Thrifty Chic is on it's way to your home. Thanks to all who left comments on my blog and fb. Happy Thrifting y'all!!

Blessings...

Thursday, March 8, 2012

Thrifting give away


I love to go treasure hunting...When I see a treasure (thrift) store, my heart skips a beat and then my mind races to the possibilites that lay in "store" for me... I have found furniture, clothes, amazing fabrics, re-do projects (some are still waiting for their redo), books, everyday objects, glass, vintage china..One time I found Wedgewood plates that were 33 cents each!! I have loved garage sales, flea markets, antique fairs and the like since I was a little girl. We would go with my grandmother (who was born in 1906) and she would tell us if the items were authentic, some she had when she was little, some she knew of the history, and of course, just like today, some were not the real deal! She had a wealth of knowledge to impart to me. Oh, how I wish she could still be with us especially at treasure shopping times like when we head to Round Top later this month. Right now, thrifting is becoming the "in" thing. Catch phrases like "upcylcing", "repurposing" are everywhere. My mom even saw a story on The Today Show this past week about thrifting and those that do are Savvy shoppers. So in honor of our savvy shopping, I am giving away a book entitled Thrifty Chic to one of you!!

I would love to hear about your treasure shopping experiences....Why do you like it? What has been your best find? Do you have treasure hunting friends? Tips?...Leave a comment to be entered to receive this wonderful book! We will draw the winner on March 15th!! Until next time, Happy Treasure Hunting!

Blessings,


P.S. Still looking for 100 followers..see earlier posts on the great giveaway when we reach 100!!

Wednesday, March 7, 2012

Moments... my take on Dyan Reaveley new products


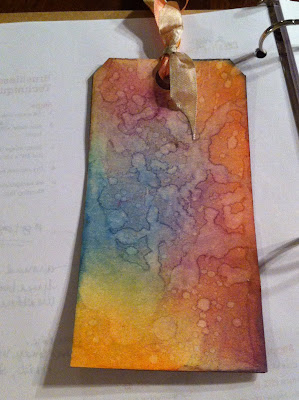
My take on Dyan's journal page....

I love to be inspired from others- be it family, friends, magazines, pinterest, designers such as Tim Holtz and today I watched this video - Scrap Time - Ep. 734 - Dyan Reaveley new Dylusions products! Dyan is a new designer for Ranger products. When I first come across a new technique or product, I am tempted to buy everything to achieve that same look. Then, I step back and remember that my studio is full of wonderful paper, stamps, inks, watercolors, acrylics, distress stains, adhesives, embellishments, ribbons--ooh how I love to make do with what I have until I find that what I have won't do....So with that said (or written), I would love to share with you my take on Dyan's journal page. She definitely has some very innovative products that I would like to try but for today
I wanted to see where I could go with her idea... So here's how I created a similar look....(I forgot to take pictures along the way but there are some close ups...)

Products I used...
*Watercolor paper *watercolors in the tube not palette
*mini misters *water
* stencils *Stazon
*various inks shades of white *texture magic/palette knife
*butterfly stamps *Birdhouse stamp
*background/word stamps *heat gun
*Adhesive *paper towels
*embellishments *Diecutting machine ( I used my Big Shot)
*sewing machine and thread


To begin...
1. Fill mini misters 3/4 full of water and then add 1 -2 "drops" (this comes out like acrylic) of your choice of watercolors. I used 3 - a salmon, a yellow (mixed with perfect pearls)** and a blue-which I made a very soft shade by adding a small amount of watercolor.
2. Spritz your watercolor misters onto watercolor paper (wc). Using paper towels, blot the excess paint. Save the paper towels for later use (embellishments). Using heat tool, dry paper.
3. To stencil, use a stencil brush with stazon or archival black ink. Then randomly stencil dots onto your wc paper.
4. For gesso, I used Texture magic - a dimensional medium that I love. Also, my gesso was old and had dried a bit--guess I just found something I need:). With palette knife and texture magic, drag the texture magic over the stencil and quickly lift up the stencil. If you do a thinner coat, you can dry it by using the heat tool.

close up of the texture magic..

5. Stamp images and word stamp around the page. I chose butterflies and "moments".
6. With an unmounted swirl stamp and a wheat colored ink, roll with your hand (do not mount on an acrylic block) the swirl stamp for the soft effect of a background. When you roll the stamp, you truly create a background. Make sure the background stamp does not have hard corners as this will create a finite image as opposed to a soft, shaded background.
7. On a separate piece of cardstock stamp birdhouse. Using the mini mister (salmon), spritz image and cut around outline leaving a little edging. Heat set and then adhere to page. you may add stickles to the image for a glistening.
8. Add a clock face and a ribbon or the embellishment of your choice.

close up of birdhouse and texture magic


9. For butterfly embellishments, using die cut machine and butterfly die, layer the paper towel that you used in the beginning and die cut. Keeping layers together, sew down the center of butterfly (if you do not want to sew, carefully glue the layers together with a small amount of adhesive).Repeat for second butterfly.

10. Adhere wc page to heavy chipboard or cardstock. I love to use file folders. The blue ones are my favorites!!
11. Then with ribbon, wrap around card and tie a 3 loop bow and then adhere metal butterfly and stamens. Sew paper towel butterflies to ribbon and then manipulate ribbon to your liking and adhere with glue stick.


I do hope you enjoyed this take on Dyan's journal page. I enjoyed stretching myself and seeing what can be done with what is in front of me. It was fun to play and to remember I don't always need the next thing out there. I have been blessed with much! But what I do need are moments-moments to enjoy what had been given to me- blessings of family, health, friends, home, daily living, art, my studio, music, food on my table, my garden, my animals, the ability to learn and grow, my walk with the Lord..my list could go on....For you, I hope you find moments in your days to see all the beauty the Lord has given us. Here's to many moments.... Until next time,

Blessings,

P.S. Remember when we reach 100 followers, everyone is entered in a drawing for a letter press kit. Tell your friends to come follow along- Thanks!!

Tuesday, March 6, 2012

Pour Vous...


People seem to embrace all things French..from the images of Paris to the lavender fields of Provence. I, too, embrace the French but for far deeper reasons than fashion, fad or fame. Mine is for Family. My mother is a true Parisienne..born and raised in Chaville (a little town near Versailles), was a child during WW2 where my grandfather was in the military and my grandmother (Bonne Maman) raised her 4 children during the most difficult circumstances, Studied in Paris, sat in the Louvre during Art Class, learning from the masterpieces that are so well known to us. She met (through the Church)and married my daddy (an American)...a romantic life for us to hear about as we were growing up. Yes, we love all things French and yet my mom also loves all things American as well as all that she has experienced here. She loves our history and probably knows more about it than most Americans. My parents lived in Northern Virginia for 33 years - so it's safe to say that with my Dad at the Pentagon and my mom lending her incredible embroidery skills for restoration at the Woodlawn plantation (just one area in her life that she gave of her talents) being active in our church, and of course taking guests to the Smithsonian, to the Capitol, to the Pentagon -living life near our nation's earliest history leaves an indelible mark on our lives.

But for today, here are a few vintage French images... First a vintage postcard with the most famous of landmarks and the second, a certificate for that extra special student of the month..perhaps for just a moment, all of us could have the Tableau d'honneur bestowed upon us.

Until next time,

Blessings,